
LOCKPICKTOOL
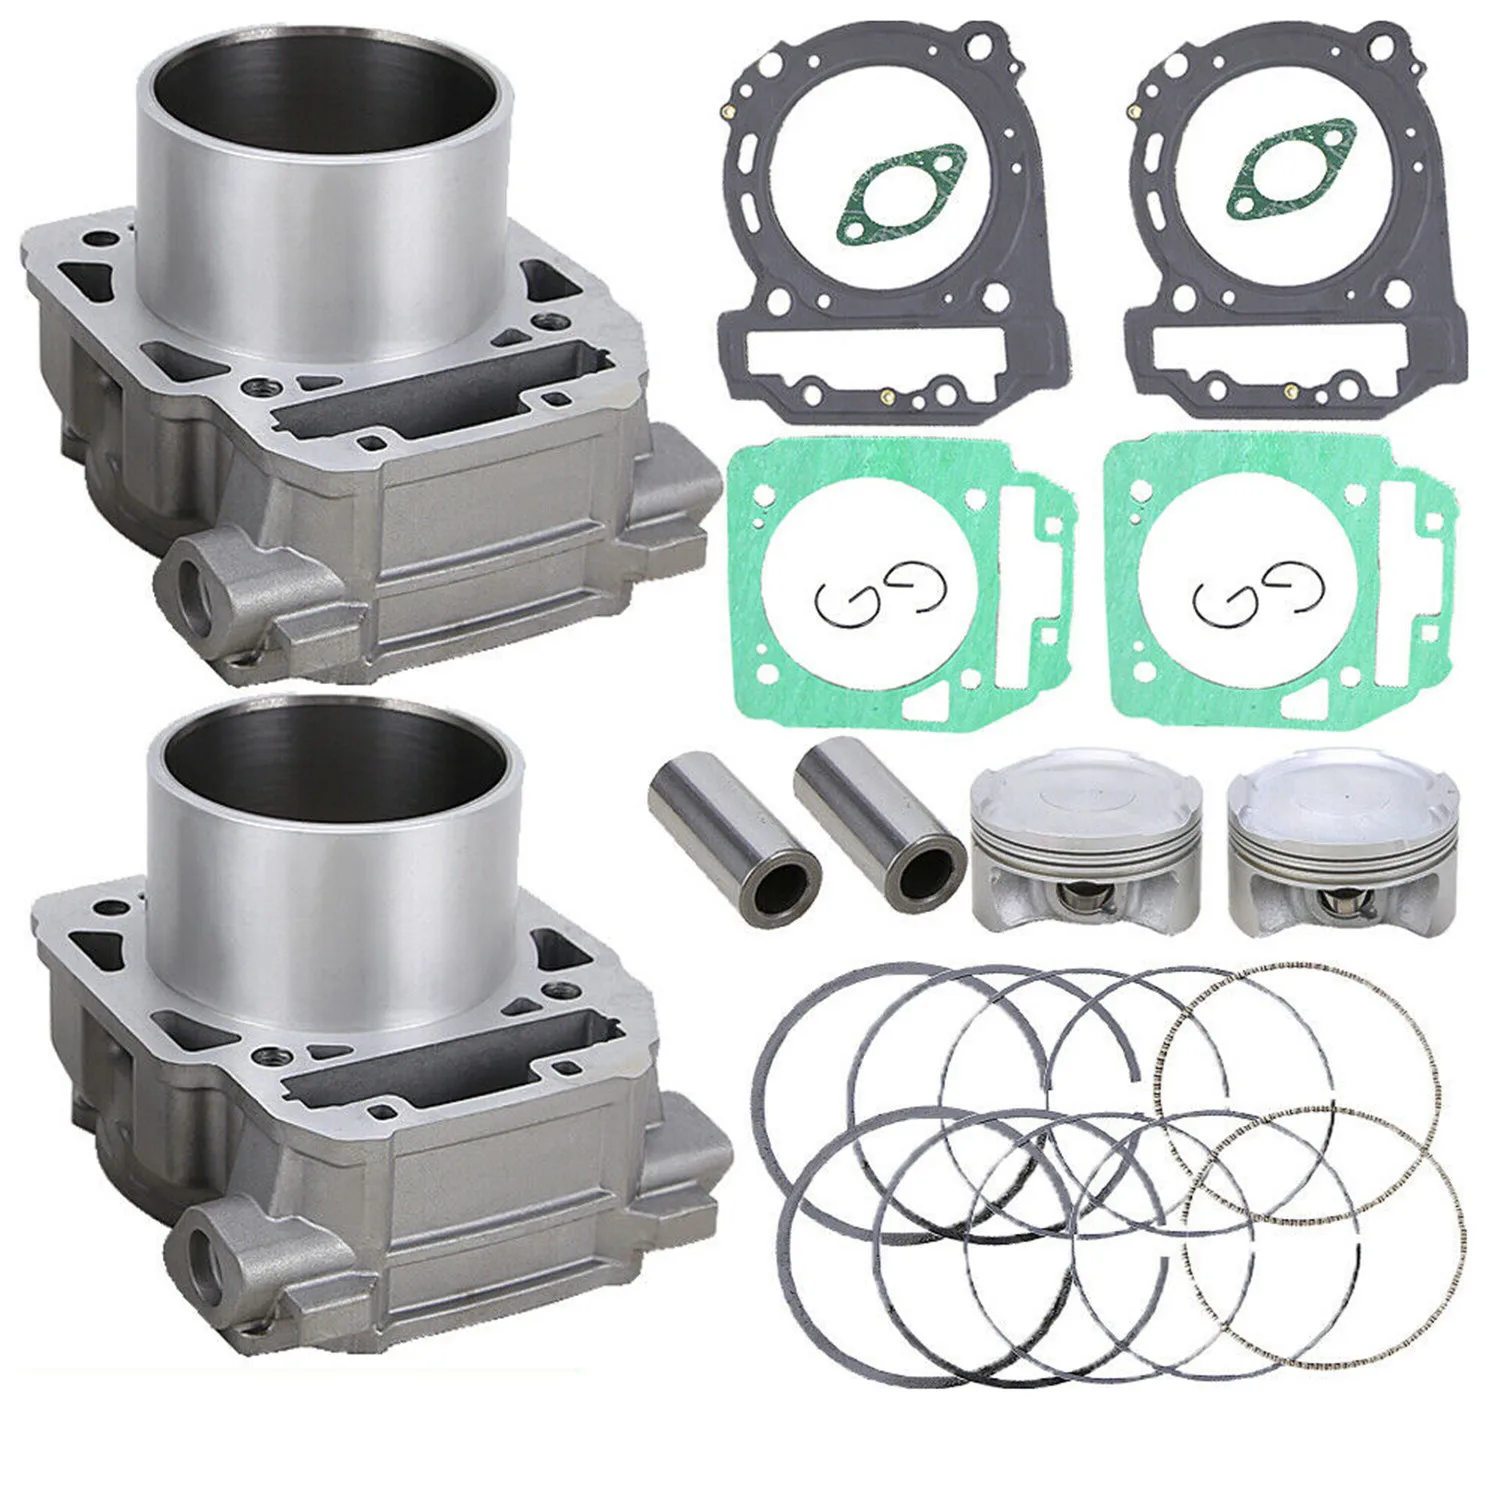
2 Cylinders Piston 2 Gasket Kit For Can-Am BRP Commander Maverick Outlander 1000 420929650 420845109 420845107 420845106
2 Cylinders Piston 2 Gasket Kit For Can-Am BRP Commander Maverick Outlander 1000 420929650 420845109 420845107 420845106
In stock
-
All orders are dispatched the next business day!
-
We will beat any price. We back all products with a 1 year guarantee.
Order in the next 0 hours 0 minutes to get it by /10/2026
Couldn't load pickup availability
Guaranteed Safe Checkout
2 Cylinders Piston2 Gasket kits For Can-Am BRP Commander Maverick Outlander 1000
Specification:
-
Item Type: Cylinder Piston Gasket Ring Top End Rebuild Kit
-
Color: Gray or Silver
-
Condition: 100% brand new and high quality
-
Cylinder Bore: 91mm
Replace Part Number:
-
420929650,420845109, 420845107,
-
420845106, 420685714, 420685244,
-
420630850, 420630210, 420630195,
-
420613587, 420613586, 420613584,
-
420613583, 420613582, 420613581,
-
420413431, 420413430, 420296775,
-
420296774, 420296770, 420216272, 420216270
Features:
-
Strictly supervised for excellent craftsmanship, high degree of accuracy
-
Good sealing performance, fully satisfy the application requirement
-
Excellent performance in heat dissipation, low noise and high reliability
-
Provide powerful driving force for vehicles, high operation efficiency
-
Wear resistance, high toughness, long service life, low cost for maintenance
Fitment:
-
For Bombardier Outlander 400: 2003-2006
-
For Bombardier Outlander 650: 2006
-
For Bombardier Outlander 800: 2006
-
For Bombardier Outlander Max 400: 2004-2006
-
For Bombardier Outlander Max 650: 2006
-
For Bombardier Outlander Max 800: 2006
-
For Can-Am Commander 1000: 2011-2014
-
For Can-Am Commander 800: 2011-2016
-
For Can-Am Commander 800R: 2011-2016
-
For Can-Am Commander Max 1000: 2014-2017
-
For Can-Am Commander Max 800R: 2016-2020
-
For Can-Am Defender HD10: 2016
-
For Can-Am Defender HD8: 2016-2020
-
For Can-Am Defender Max HD8: 2017-2018
-
For Can-Am Maverick 1000: 2013-2014
-
For Can-Am Maverick 1000R: 2014
-
For Can-Am Maverick Max 1000R: 2014-2016
-
For Can-Am Outlander 1000: 2013-2017
-
For Can-Am Outlander 400: 2007-2014
-
For Can-Am Outlander 650: 2016-2017
-
For Can-Am Outlander 800: 2007-2015
-
For Can-Am Outlander 800R: 2009-2015
-
For Can-Am Outlander 850: 2019-2020
-
For Can-Am Outlander Max 400: 2007-2014
-
For Can-Am Outlander Max 650: 2007-2014
-
For Can-Am Outlander Max 800: 2007-2015
-
For Can-Am Outlander Max 800R: 2009-2015
-
For Can-Am Renegade 1000: 2012-2017
-
For Can-Am Renegade 1000R: 2016-2017
-
For Can-Am Renegade 800: 2007-2015
-
For Can-Am Renegade 800R: 2009-2015
Package Included:
-
2 x Cylinder
-
2 x Head Gasket
-
2 x Base Gasket
-
2 x Piston
-
2 x Piston Pin
-
4 x Circlips
-
2 x Complete Set of Rings
-
(As pictures shown)
1、 Preparation work before installation
Prepare tools and parts:
1. Wrench and wrench socket:Choose a wrench and wrench socket that is suitable for the size of each bolt and nut on the motorcycle.
2. Piston unloader: Use a piston unloader to safely remove piston components.
3. Cleaning agent and brush: Prepare cleaning agent and brush to clean the piston ring groove and cylinder wall before replacing the middle cylinder.
4. New middle cylinder: Ensure that the purchased middle cylinder is suitable for this vehicle model.
2、 Key steps in the installation process
1. Unloading components:
a. Remove the side cover, seat, and fuel tank of the motorcycle in sequence, and ensure that the fuel valve is closed before disassembly to avoid fuel leakage.
b. Remove the cylinder head and cylinder head. Depending on the vehicle model, other components may need to be removed.
2. Remove the old cylinder block.
3. Check whether there are any scratches or other issues on the surface of the piston. If there are scratches, the piston needs to be replaced.
When replacing the piston, pay attention to the installation position of the piston ring and ensure that the opening position of the piston ring does not match the piston pin. The opening of each piston ring should be staggered
120 ° -180 °.
Before installation, the cylinder body needs to be cleaned with cleaning agent and brush to clean the inner hole and upper and lower surfaces of the cylinder body, and ensure that there are no stains or dirt on the cylinder body and upper and lower surfaces
Add debris and evenly apply lubricating oil to the cylinder bore and piston; Ensure that the piston gently slides into the cylinder body when installing the cylinder body; The cylinder body can rotate after installation
Start the arm, check that the piston is running normally in the cylinder bore, and then install its accessories.
3、 Inspection and follow-up work after installation
Final cleaning: After the cylinder liner is installed, wipe the inner wall of the cylinder liner with a lint free white cloth to ensure that there are no impurities, dust, or fingerprints.
Recheck:Check if all connecting components are secure and if there are any tools or debris left in the cabin.
First launch:
Before starting, you can unplug the ignition coil or fuel pump fuse, run the starter for a short period of time, and allow the oil circulation to establish oil pressure.
Connect all components and start the engine. Pay attention to observe for any abnormal noise, smoke, or leaks.
Common mistakes and taboos
Taboo 1:Strike directly with a hammer. It can cause deformation, cracking, or damage to the cylinder liner or sealing ring.
Taboo 2:Use old or inferior sealing rings. This is a common cause of engine "oil-water mixing" or water leakage.
Taboo 3: Tilt the cylinder liner during installation. Causing permanent deformation of the cylinder liner, increased resistance to piston operation, and early wear.
Taboo 4: Incomplete cleaning. Any small impurities can become "abrasives", causing severe wear and tear on the engine at the moment of starting.


Description
Description
2 Cylinders Piston2 Gasket kits For Can-Am BRP Commander Maverick Outlander 1000
Specification:
-
Item Type: Cylinder Piston Gasket Ring Top End Rebuild Kit
-
Color: Gray or Silver
-
Condition: 100% brand new and high quality
-
Cylinder Bore: 91mm
Replace Part Number:
-
420929650,420845109, 420845107,
-
420845106, 420685714, 420685244,
-
420630850, 420630210, 420630195,
-
420613587, 420613586, 420613584,
-
420613583, 420613582, 420613581,
-
420413431, 420413430, 420296775,
-
420296774, 420296770, 420216272, 420216270
Features:
-
Strictly supervised for excellent craftsmanship, high degree of accuracy
-
Good sealing performance, fully satisfy the application requirement
-
Excellent performance in heat dissipation, low noise and high reliability
-
Provide powerful driving force for vehicles, high operation efficiency
-
Wear resistance, high toughness, long service life, low cost for maintenance
Fitment:
-
For Bombardier Outlander 400: 2003-2006
-
For Bombardier Outlander 650: 2006
-
For Bombardier Outlander 800: 2006
-
For Bombardier Outlander Max 400: 2004-2006
-
For Bombardier Outlander Max 650: 2006
-
For Bombardier Outlander Max 800: 2006
-
For Can-Am Commander 1000: 2011-2014
-
For Can-Am Commander 800: 2011-2016
-
For Can-Am Commander 800R: 2011-2016
-
For Can-Am Commander Max 1000: 2014-2017
-
For Can-Am Commander Max 800R: 2016-2020
-
For Can-Am Defender HD10: 2016
-
For Can-Am Defender HD8: 2016-2020
-
For Can-Am Defender Max HD8: 2017-2018
-
For Can-Am Maverick 1000: 2013-2014
-
For Can-Am Maverick 1000R: 2014
-
For Can-Am Maverick Max 1000R: 2014-2016
-
For Can-Am Outlander 1000: 2013-2017
-
For Can-Am Outlander 400: 2007-2014
-
For Can-Am Outlander 650: 2016-2017
-
For Can-Am Outlander 800: 2007-2015
-
For Can-Am Outlander 800R: 2009-2015
-
For Can-Am Outlander 850: 2019-2020
-
For Can-Am Outlander Max 400: 2007-2014
-
For Can-Am Outlander Max 650: 2007-2014
-
For Can-Am Outlander Max 800: 2007-2015
-
For Can-Am Outlander Max 800R: 2009-2015
-
For Can-Am Renegade 1000: 2012-2017
-
For Can-Am Renegade 1000R: 2016-2017
-
For Can-Am Renegade 800: 2007-2015
-
For Can-Am Renegade 800R: 2009-2015
Package Included:
-
2 x Cylinder
-
2 x Head Gasket
-
2 x Base Gasket
-
2 x Piston
-
2 x Piston Pin
-
4 x Circlips
-
2 x Complete Set of Rings
-
(As pictures shown)
1、 Preparation work before installation
Prepare tools and parts:
1. Wrench and wrench socket:Choose a wrench and wrench socket that is suitable for the size of each bolt and nut on the motorcycle.
2. Piston unloader: Use a piston unloader to safely remove piston components.
3. Cleaning agent and brush: Prepare cleaning agent and brush to clean the piston ring groove and cylinder wall before replacing the middle cylinder.
4. New middle cylinder: Ensure that the purchased middle cylinder is suitable for this vehicle model.
2、 Key steps in the installation process
1. Unloading components:
a. Remove the side cover, seat, and fuel tank of the motorcycle in sequence, and ensure that the fuel valve is closed before disassembly to avoid fuel leakage.
b. Remove the cylinder head and cylinder head. Depending on the vehicle model, other components may need to be removed.
2. Remove the old cylinder block.
3. Check whether there are any scratches or other issues on the surface of the piston. If there are scratches, the piston needs to be replaced.
When replacing the piston, pay attention to the installation position of the piston ring and ensure that the opening position of the piston ring does not match the piston pin. The opening of each piston ring should be staggered
120 ° -180 °.
Before installation, the cylinder body needs to be cleaned with cleaning agent and brush to clean the inner hole and upper and lower surfaces of the cylinder body, and ensure that there are no stains or dirt on the cylinder body and upper and lower surfaces
Add debris and evenly apply lubricating oil to the cylinder bore and piston; Ensure that the piston gently slides into the cylinder body when installing the cylinder body; The cylinder body can rotate after installation
Start the arm, check that the piston is running normally in the cylinder bore, and then install its accessories.
3、 Inspection and follow-up work after installation
Final cleaning: After the cylinder liner is installed, wipe the inner wall of the cylinder liner with a lint free white cloth to ensure that there are no impurities, dust, or fingerprints.
Recheck:Check if all connecting components are secure and if there are any tools or debris left in the cabin.
First launch:
Before starting, you can unplug the ignition coil or fuel pump fuse, run the starter for a short period of time, and allow the oil circulation to establish oil pressure.
Connect all components and start the engine. Pay attention to observe for any abnormal noise, smoke, or leaks.
Common mistakes and taboos
Taboo 1:Strike directly with a hammer. It can cause deformation, cracking, or damage to the cylinder liner or sealing ring.
Taboo 2:Use old or inferior sealing rings. This is a common cause of engine "oil-water mixing" or water leakage.
Taboo 3: Tilt the cylinder liner during installation. Causing permanent deformation of the cylinder liner, increased resistance to piston operation, and early wear.
Taboo 4: Incomplete cleaning. Any small impurities can become "abrasives", causing severe wear and tear on the engine at the moment of starting.
Item Specifics
Item Specifics


Have a Question?
Powering Your Potential: Where Innovation Meets Convenience!
-
Focus on Benefits:
A well-crafted product description not only informs potential buyers about the features and benefits of your offering but also captivates their interest and compels them to make a purchase.
-
Know Your Audience: